Window projection setup — Your window as a cosy Christmas screen in Australia
Window projection setup works well when you keep things simple. Start small. Pick one window and plan a short trial. This lets you learn the basics without stress. Try the idea on a weekend night when ambient light is low. That first test will show how bright your projector needs to be and whether your film choice gives the look you want.
Why choose your window as a projection surface?
Window projection setup gives you instant theatre on the street. You do not need scaffolding or a big screen. A window already faces public view and can catch attention easily. You can create a warm, seasonal scene that feels friendly and local. People walking or driving by see your display without stepping onto your property. This keeps things respectful and low-effort.
The setup is also flexible. You can swap content nightly. Keep spooky animations for Halloween and move to warm snow scenes for Christmas. The cost stays low if you reuse a projector and film. For many, this is the first step into event projection. It builds confidence for larger displays later. It also lets you try out different content sizes and brightness levels without committing to long-term installs.
Start with a quick trial and note three things: image clarity, brightness, and how the projection looks from the street. Take photos during the test so you can compare adjustments. That visual record helps when you tweak distance, angle, or film. Keep the early tests short and safe. That way, you learn fast and avoid common mistakes.
Choosing the right film and screen material
Window projection setup needs the right surface. Plain glass is too reflective and gives weak contrast. Frosted or rear-projection film changes that. A diffuse film turns your pane into a soft screen. It helps colours sit well and reduces hotspots. For a crisp Christmas look, choose a high-quality rear-projection film designed for glass. It is thin, easy to apply, and removable.
Measure your window first. Cut the film to size with a small overlap. Clean glass thoroughly before you stick the film. Use a mild soap and a lint-free cloth. Wet-apply the film with a soapy spray. This lets you shift it until it sits straight. Squeegee out bubbles carefully. Work from the center to the edges. If you live where nights get cold or windy, use a film that tolerates temperature changes without peeling.
For double-glazed windows, pick an adhesive that removes cleanly. Avoid films that trap moisture or trap heat against the glass. If you rent your place, check with your landlord before making changes. Finally, test the film at night with your projector. Slight adjustments in the film’s angle or distance often improve sharpness and contrast. Keep notes so you can reproduce the set-up next year.
Projector choice and placement made simple
Window projection setup benefits from matching projector to the size of your window. For small to medium windows, a compact short-throw projector is great. It sits close to the window and keeps cables short. For larger windows you may need a higher-lumen model. Aim for a balance: more lumens for bright streets, fewer lumens when you control ambient light.
Think about throw distance and lens shift. Measure the distance from the projector to the window and use the projector’s manual to find the right zoom. Place the projector on a stable shelf or tripod. If you cannot place it indoors behind the window, consider a weatherproof box outside. Keep the lens perpendicular to the glass where possible. That reduces keystone distortion and keeps the image sharp across the whole film.
Run a cable plan before you set up. Window projection setup works best when cables are tidy and safe. Use cable clips and gaffer tape to secure runs inside and outside. Keep power sources dry and off walkways. If you use extension cords outdoors, pick a weather-rated model. Test the full layout in daylight so you know where everything will sit at night.
Getting the brightness, colours and visibility right
Window projection setup shines when you balance brightness with comfort. If your street is bright, choose 3,000 lumens or more. For quiet suburban streets, 1,500–2,500 lumens often looks great. Lower brightness helps preserve colour saturation and stops your display from blinding neighbours. Try different brightness settings and step back to view from the pavement.
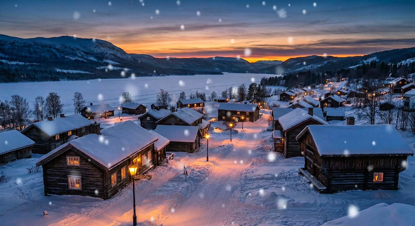
Use content with high contrast and clear shapes for best visibility. Simple animated scenes, silhouettes and slow-motion snowfall read well at a distance. Avoid tiny text or busy patterns. They disappear from the street. Adjust the projector’s colour temperature for warmer tones in winter. A slight warmth gives images a cosy feel and is easier on viewers’ eyes.
Also think about timing. Run your projection after dusk and keep hours reasonable. This respects neighbours and reduces complaints. If you live near a busy road, angle the image so headlights do not wash it out. For maximum effect, synchronise audio only if you are sure it will not disturb people. Often, a silent visual is the most neighbour-friendly choice.
Safety, cable management and practical tips
Window projection setup must be safe first. Secure the projector to a stable mount. Use a surge protector and keep power away from water. Route cables so they do not cross thresholds or create trip hazards. If you need an outdoor power point, use a licensed electrician to install it. For temporary setups, use rated outdoor extension cords and protect connectors with weatherproof boxes.
Heat is another factor. Projectors produce heat and need airflow. Do not enclose them tightly. Allow a small gap around the unit and avoid placing it on flammable materials. If you run the projector for long evenings, check the unit periodically to ensure it stays cool. Many projectors will shut down automatically if they overheat, but it is best not to test that safety feature often.
Finally, be considerate. Choose content that is family-friendly and avoid flashing images that trigger photosensitive viewers. Inform neighbours ahead of big runs, especially if you plan sound or bright shows. Keep a simple checklist: check the film adhesion, test the projector, secure cables, and run a short preview before a full evening. With those steps, your window show will be a joyful, low-hassle addition to your street for the season.
Popular projections